This is translation of Slack Next-gen Platform – Button Interactions – DEV Community 👩💻👨💻written by Kaz (SDK Engineering & DevRel at Slack), I do not include any personal opinion here except guessing when meaning of original text is not clear for me)
이 글은 슬랙의 SDK Engineering / DevRel 인 Kaz 의 글을 번역한것입니다. 저의 개인 의견은 들어가지 않으며, 일부 원문의 의미가 애매한 경우에만 부연 설명을 달았습니다.
이번 튜토리얼에서는 버튼을 사용하여 인터렉션을 하는 방법을 배워보겠습니다.
차세대 플랫폼의 앱에서 버튼 인터렉션을 추가하는 방법은 2가지가 있습니다.
- 빌트인 SendMessage 펑션의 interactive_blocks 을 사용하고, 거기에 추가로 block_actions 이벤트를 다룰 수 있는 커스텀 펑션을 추가하는 것
- 버튼으로 메세지를 보낼 수 있는 커스텀 펑션을 만들고, block_actions 이벤트를 위한 핸들러를 추가하는 방법.
이번 글에서는 두가지 모두 다 다룹니다.
Prerequisites
차세대 플랫폼을 접하는 것이 처음이시라면, 이전의 튜토리얼인 “The Simplest Hello World” 부터 읽어주세요. 요약하면 유료 Slack 워크스페이스와 해당 워크스페이스에서 “beta feature” 를 사용할 수 있는 권한이 필요합니다. 가지고 계시다면 Slack CLI 와 워크스페이스를 연결하기만 하면 됩니다.
준비되었다면 앱을 한번 만들어보도록 하죠. 시작해보겠습니다.
Create a Blank Project
slack create 명령어를 사용하여, 새로운 프로젝트를 시작할 수 있습니다. 이 튜토리얼에서는 아무것도 없는 상태에서 앱을 만들어보겠습니다. “Blank Project” 를 선택하여 주십시요.
$ slack create
? Select a template to build from:

  Hello World
  A simple workflow that sends a greeting

  Scaffolded project
  A solid foundational project that uses a Slack datastore

> Blank project
  A, well.. blank project

  To see all available samples, visit github.com/slack-samples.
프로젝트가 생성되면, slack run 명령어가 정상적으로 동작하는지 확인해보세요. 이 명령어는 “dev” 버전의 앱을 워크스페이스에 설치합니다. 이 앱의 봇 유저가 생성되고, 이 봇은 API 호출을 위한 봇 토큰 값을 가지고 있습니다.
$ cd affectionate-panther-654
$ slack run
? Choose a workspace  seratch  T03E94MJU
   App is not installed to this workspace

Updating dev app install for workspace "Acme Corp"

  Outgoing domains
   No allowed outgoing domains are configured
   If your function makes network requests, you will need to allow the outgoing domains
   Learn more about upcoming changes to outgoing domains: https://api.slack.com/future/changelog
  seratch of Acme Corp
Connected, awaiting events
Handle button clicks on SendMessage Function’s interactive_blocks
빌트인 Schema.slack.functions.SendMessage 펑션은 인터렉티브 Block Kit 컴포넌트를 간소화시킨 버전을 제공합니다. 메세지에 간단한 블록을 추가할 수 있고, 그 다음의 커스텀 펑션은 클릭 이벤트에 대해 반응 할 수 있습니다.
interactive_blocks 핸들링을 위한 데모 워크플로를 만들건데, 두개의 파일을 생성 하겠습니다.
- 워크플로와 link 트리거가 정의되어 있는 interactive_blocks_demo.ts
- interactive_blocks 내의 버튼 클릭 이벤트를 다루는 커스텀 펑션이 정의되어 있는 handle_interactive_blocks.ts
다음 코드를 interactive_blocks_demo.ts 라는 이름으로 저장합니다.
import { DefineWorkflow, Schema } from "deno-slack-sdk/mod.ts";
export const workflow = DefineWorkflow({
  callback_id: "demo-workflow",
  title: "Demo Workflow",
  input_parameters: {
    properties: {
      channel_id: { type: Schema.slack.types.channel_id },
      user_id: { type: Schema.slack.types.user_id },
    },
    required: ["channel_id", "user_id"],
  },
});

// Send a message via SendMessage + interactive_blocks
const sendMessageStep = workflow.addStep(Schema.slack.functions.SendMessage, {
  channel_id: workflow.inputs.channel_id,
  message: `Do you approve <@${workflow.inputs.user_id}>'s time off request?`,
  // Simplified blocks for interactions
  interactive_blocks: [
    {
      "type": "actions",
      "block_id": "approve-deny-buttons",
      "elements": [
        {
          type: "button",
          action_id: "approve",
          text: { type: "plain_text", text: "Approve" },
          style: "primary",
        },
        {
          type: "button",
          action_id: "deny",
          text: { type: "plain_text", text: "Deny" },
          style: "danger",
        },
      ],
    },
  ],
});

// Handle the button click events on interactive_blocks
import { def as handleInteractiveBlocks } from "./handle_interactive_blocks.ts";
workflow.addStep(handleInteractiveBlocks, {
  // The clicked action's details
  action: sendMessageStep.outputs.action,
  // For further interactions on a modal
  interactivity: sendMessageStep.outputs.interactivity,
  // The message's URL
  messageLink: sendMessageStep.outputs.message_link,
  // The message's unique ID in the channel
  messageTs: sendMessageStep.outputs.message_ts,
});

import { Trigger } from "deno-slack-api/types.ts";
const trigger: Trigger<typeof workflow.definition> = {
  type: "shortcut",
  name: "Interaction Demo Trigger",
  workflow: `#/workflows/${workflow.definition.callback_id}`,
  inputs: {
    channel_id: { value: "{{data.channel_id}}" },
    user_id: { value: "{{data.user_id}}" },
  },
};
export default trigger;
아직 handle_interactive_blocks.ts 를 안만들었기 때문에, TS 컴파일은 실패합니다. handle_interactive_blocks.ts 를 만들겠습니다. 이 커스텀 펑션은 SendMessage 펑션으로부터 전달되는 클릭 이벤트를 다룹니다.
import { DefineFunction, Schema, SlackFunction } from "deno-slack-sdk/mod.ts";

export const def = DefineFunction({
  callback_id: "handle_interactive_blocks",
  title: "Handle button clicks in interactive_blocks",
  source_file: "handle_interactive_blocks.ts",
  input_parameters: {
    // The input values from the SendMessage function's interactive_blocks
    properties: {
      action: { type: Schema.types.object },
      interactivity: { type: Schema.slack.types.interactivity },
      messageLink: { type: Schema.types.string },
      messageTs: { type: Schema.types.string },
    },
    required: ["action", "interactivity"],
  },
  output_parameters: { properties: {}, required: [] },
});

export default SlackFunction(
  def,
  // When the worfklow is executed, this handler is called
  async ({ inputs, client }) => {
    if (inputs.action.action_id === "deny") {
      // Only when the click is on "Deny", this function opens a modal
      // to ask the reason of the denial
      const response = await client.views.open({
        interactivity_pointer: inputs.interactivity.interactivity_pointer,
        view: buildNewModalView(),
      });
      if (response.error) {
        const error = `Failed to open a modal due to ${response.error}`;
        return { error };
      }
      // Continue the interactions on the modal
      return { completed: false };
    }
    return { completed: true, outputs: {} };
  },
)
  // Handle the button click events on the modal
  .addBlockActionsHandler("clear-inputs", async ({ body, client }) => {
    const response = await client.views.update({
      interactivity_pointer: body.interactivity.interactivity_pointer,
      view_id: body.view.id,
      view: buildNewModalView(),
    });
    if (response.error) {
      const error = `Failed to update a modal due to ${response.error}`;
      return { error };
    }
    return { completed: false };
  })
  // Handle the data submission from the modal
  .addViewSubmissionHandler(
    ["deny-reason-submission"],
    ({ view }) => {
      const values = view.state.values;
      const reason = String(Object.values(values)[0]["deny-reason"].value);
      if (reason.length <= 5) {
        console.log(reason);
        const errors: Record<string, string> = {};
        const blockId = Object.keys(values)[0];
        errors[blockId] = "The reason must be 5 characters or longer";
        return { response_action: "errors", errors };
      }
      return {};
    },
  )
  // Handle the events when the end-user closes the modal
  .addViewClosedHandler(
    ["deny-reason-submission", "deny-reason-confirmation"],
    ({ view }) => {
      console.log(JSON.stringify(view, null, 2));
    },
  );

/**
 * Returns the initial state of the modal view
 * @returns the initial modal view
 */
function buildNewModalView() {
  return {
    "type": "modal",
    "callback_id": "deny-reason-submission",
    "title": { "type": "plain_text", "text": "Reason for the denial" },
    "notify_on_close": true,
    "submit": { "type": "plain_text", "text": "Confirm" },
    "blocks": [
      {
        "type": "input",
        // If you reuse block_id when refreshing an existing modal view,
        // the old block may remain. To avoid this, always set a random value.
        "block_id": crypto.randomUUID(),
        "label": { "type": "plain_text", "text": "Reason" },
        "element": {
          "type": "plain_text_input",
          "action_id": "deny-reason",
          "multiline": true,
          "placeholder": {
            "type": "plain_text",
            "text": "Share the reason why you denied the request in detail",
          },
        },
      },
      {
        "type": "actions",
        "block_id": "clear",
        "elements": [
          {
            type: "button",
            action_id: "clear-inputs",
            text: { type: "plain_text", text: "Clear all the inputs" },
            style: "danger",
          },
        ],
      },
    ],
  };
}
manifest.ts 에 추가해주시구요
import { Manifest } from "deno-slack-sdk/mod.ts";
// Add this
import { workflow as InteractiveBlocksDemo } from "./interactive_blocks_demo.ts";

export default Manifest({
  name: "stoic-wolf-344",
  description: "Demo workflow",
  icon: "assets/default_new_app_icon.png",
  workflows: [InteractiveBlocksDemo], // Add this
  outgoingDomains: [],
  botScopes: ["commands", "chat:write", "chat:write.public"],
});
이제 준비가 됐습니다. slack run 커맨드를 실행하여 에러 발생 여부를 확인하세요.
$ slack run
? Choose a workspace seratch T03E94MJU
stoic-wolf-344 A04G9S43G2K
Updating dev app install for workspace "Acme Corp"
⚠️ Outgoing domains
No allowed outgoing domains are configured
If your function makes network requests, you will need to allow the outgoing domains
Learn more about upcoming changes to outgoing domains: https://api.slack.com/future/changelog
✨ seratch of Acme Corp
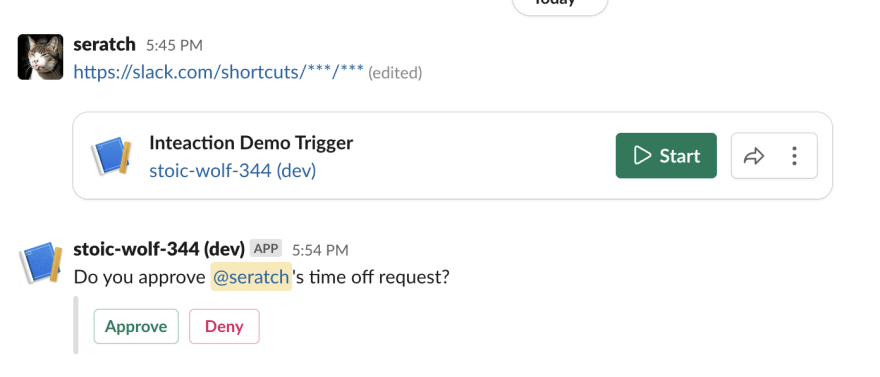
Connected, awaiting events그리고 또다른 터미널을 열어서 slack triggers create –trigger-def interactive_blocks_demo.ts 를 실행하여 link 트리거를 생성해줍니다.
$ slack triggers create --trigger-def interactive_blocks_demo.ts
? Choose an app seratch (dev) T03E94MJU
stoic-wolf-344 (dev) A04G9S43G2K
⚡ Trigger created
Trigger ID: Ft04HCF4SSBB
Trigger Type: shortcut
Trigger Name: Interaction Demo Trigger
URL: https://slack.com/shortcuts/***/***
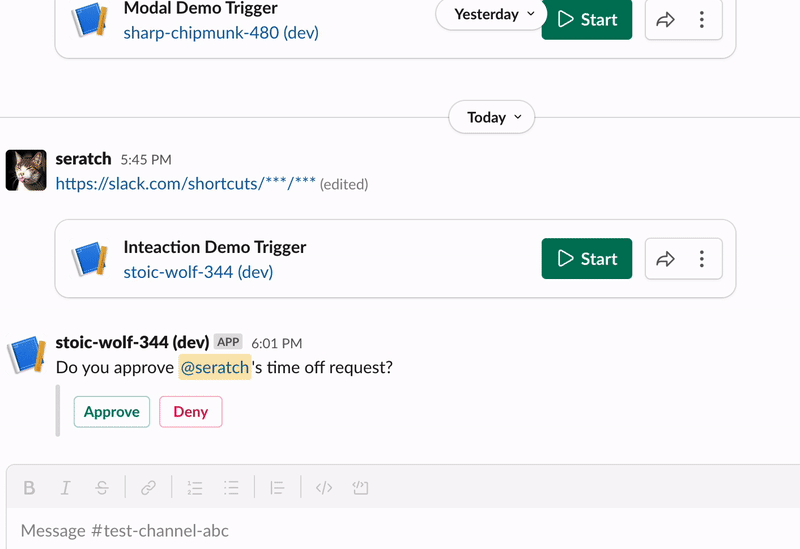
$생선된 link 트리거를 채널에 남기고 눌러봅시다. 두개의 버튼이 있는 메세지를 보실 수 있을 겁니다.
“Approve” 버튼을 누르면, handle_interactive.ts 펑션이 이벤트 요청을 수락하고 아무일도 안합니다. 이 경우 interactive_blocks 부분이 플랫폼에 의해 대체되는 것 말고는 아무일도 발생하지 않습니다.
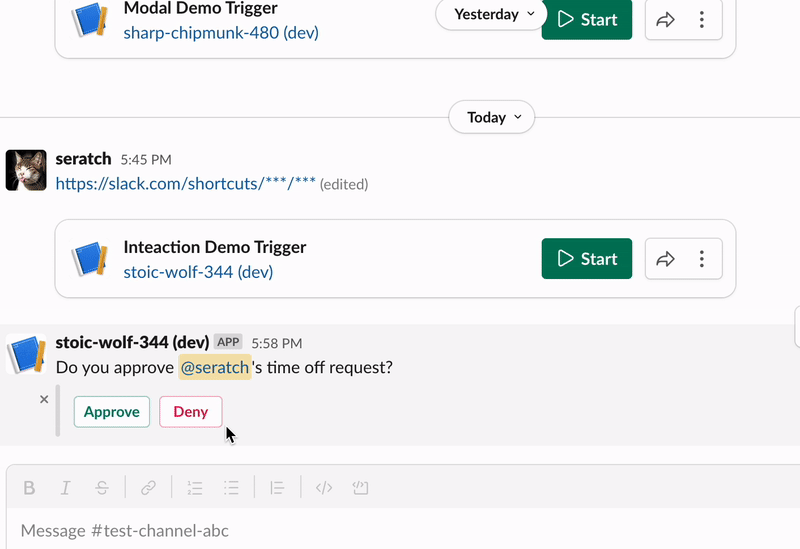
반대로 “Deny” 버튼을 누르면, 커스텀 펑션이 Deny 사유를 물어보는 새로운 모달 화면을 띄웁니다.
또한 화면의 데이터 서브미션을 위한 추가적인 핸들러가, 입력된 데이터가 유효한지 (길이) 체크하고, 동시에 입력값을 지울 수 있는 버튼까지 제공합니다.
보시는 바와 같이, 이러한 간단한 승인 절차를 만들 때, 빌트인 interactive_blocks 를 사용하면 간단하게 구현할 수 있습니다. 그렇지만, 어떤 부분은 커스터마이징 할 수 없는데요, 예를 들면, 버튼이 클릭 되었을 때 interactive_blocks 파트 부분을 업데이트 한다거나 하는 부분이 안됩니다. 만약 인터렉션에 대해서 모든 제어를 하고 싶다면, Block Kit 을 사용해서 인터렉티브한 메시지 블록을 만들 수 있습니다. 다음 섹션에서 배워볼 것입니다.
Write Custom Function With Full Interactivity Features
send_interactive_message.ts 라는 이름을 가진 파일을 만듭니다. 이 소스파일에는 Block Kits 의 블록을 사용해서 채널로 메세지를 보내고, 메세지 블록의 모든 인터렉티브 이벤트를 다루는 커스텀 펑션이 정의되어 있습니다.
import { DefineFunction, Schema, SlackFunction } from "deno-slack-sdk/mod.ts";

export const def = DefineFunction({
  callback_id: "send_interactive_message",
  title: "Send a message with interactive blocks",
  source_file: "send_interactive_message.ts",
  input_parameters: {
    properties: {
      user_id: { type: Schema.slack.types.user_id },
      channel_id: { type: Schema.slack.types.channel_id },
    },
    required: ["user_id", "channel_id"],
  },
  output_parameters: { properties: {}, required: [] },
});

export default SlackFunction(
  def,
  // When the worfklow is executed, this handler is called
  async ({ inputs, client }) => {
    const text = `Do you approve <@${inputs.user_id}>'s time off request?`;
    // Block Kit elements (https://api.slack.com/block-kit)
    const blocks = [
      {
        type: "section",
        text: { type: "mrkdwn", text },
      },
      { type: "divider" },
      {
        type: "actions",
        block_id: "approve-deny-buttons",
        elements: [
          {
            type: "button",
            action_id: "approve",
            text: { type: "plain_text", text: "Approve" },
            style: "primary",
          },
          {
            type: "button",
            action_id: "deny",
            text: { type: "plain_text", text: "Deny" },
            style: "danger",
          },
        ],
      },
    ];
    const response = await client.chat.postMessage({
      channel: inputs.channel_id,
      text,
      blocks,
    });
    if (response.error) {
      console.log(JSON.stringify(response, null, 2));
      const error = `Failed to post a message due to ${response.error}`;
      return { error };
    }
    // To continue with this interaction, return false for the completion
    return { completed: false };
  },
)
  // Handle the "Approve" button clicks
  .addBlockActionsHandler("approve", async ({ body, client, inputs }) => {
    const text = "Thank you for approving the request!";
    const response = await client.chat.update({
      channel: inputs.channel_id,
      ts: body.container.message_ts,
      text,
      blocks: [{ type: "section", text: { type: "mrkdwn", text } }],
    });
    if (response.error) {
      const error = `Failed to update the message due to ${response.error}`;
      return { error };
    }
    return { completed: true, outputs: {} };
  })
  // Handle the "Deny" button clicks
  .addBlockActionsHandler("deny", async ({ body, client, inputs }) => {
    const text =
      "OK, we need more information... Could you share the reason for denial?";
    const messageResponse = await client.chat.update({
      channel: inputs.channel_id,
      ts: body.container.message_ts,
      text,
      blocks: [{ type: "section", text: { type: "mrkdwn", text } }],
    });
    if (messageResponse.error) {
      const error =
        `Failed to update the message due to ${messageResponse.error}`;
      return { error };
    }
    const modalResponse = await client.views.open({
      interactivity_pointer: body.interactivity.interactivity_pointer,
      view: buildNewModalView(),
    });
    if (modalResponse.error) {
      const error = `Failed to open a modal due to ${modalResponse.error}`;
      return { error };
    }
    return { completed: false };
  })
  // Handle the button click events on the modal
  .addBlockActionsHandler("clear-inputs", async ({ body, client }) => {
    const response = await client.views.update({
      interactivity_pointer: body.interactivity.interactivity_pointer,
      view_id: body.view.id,
      view: buildNewModalView(),
    });
    if (response.error) {
      const error = `Failed to update a modal due to ${response.error}`;
      return { error };
    }
    return { completed: false };
  })
  // Handle the data submission from the modal
  .addViewSubmissionHandler(
    ["deny-reason-submission"],
    ({ view }) => {
      const values = view.state.values;
      const reason = String(Object.values(values)[0]["deny-reason"].value);
      if (reason.length <= 5) {
        console.log(reason);
        const errors: Record<string, string> = {};
        const blockId = Object.keys(values)[0];
        errors[blockId] = "The reason must be 5 characters or longer";
        return { response_action: "errors", errors };
      }
      return {};
    },
  )
  // Handle the events when the end-user closes the modal
  .addViewClosedHandler(
    ["deny-reason-submission", "deny-reason-confirmation"],
    ({ view }) => {
      console.log(JSON.stringify(view, null, 2));
    },
  );

/**
 * Returns the initial state of the modal view
 * @returns the initial modal view
 */
function buildNewModalView() {
  return {
    "type": "modal",
    "callback_id": "deny-reason-submission",
    "title": { "type": "plain_text", "text": "Reason for the denial" },
    "notify_on_close": true,
    "submit": { "type": "plain_text", "text": "Confirm" },
    "blocks": [
      {
        "type": "input",
        // If you reuse block_id when refreshing an existing modal view,
        // the old block may remain. To avoid this, always set a random value.
        "block_id": crypto.randomUUID(),
        "label": { "type": "plain_text", "text": "Reason" },
        "element": {
          "type": "plain_text_input",
          "action_id": "deny-reason",
          "multiline": true,
          "placeholder": {
            "type": "plain_text",
            "text": "Share the reason why you denied the request in detail",
          },
        },
      },
      {
        "type": "actions",
        "block_id": "clear",
        "elements": [
          {
            type: "button",
            action_id: "clear-inputs",
            text: { type: "plain_text", text: "Clear all the inputs" },
            style: "danger",
          },
        ],
      },
    ],
  };
}
다음으로, 위에서 만든 펑션을 사용하는 워크플로를 만들고, interactive_message_demo.ts 라는 이름으로 저장합니다.
import { DefineWorkflow, Schema } from "deno-slack-sdk/mod.ts";
export const workflow = DefineWorkflow({
  callback_id: "demo-workflow",
  title: "Demo Workflow",
  input_parameters: {
    properties: {
      channel_id: { type: Schema.slack.types.channel_id },
      user_id: { type: Schema.slack.types.user_id },
    },
    required: ["channel_id", "user_id"],
  },
});

import { def as sendInteractiveMessage } from "./send_interactive_message.ts";
workflow.addStep(sendInteractiveMessage, {
  user_id: workflow.inputs.user_id,
  channel_id: workflow.inputs.channel_id,
});

import { Trigger } from "deno-slack-api/types.ts";
const trigger: Trigger<typeof workflow.definition> = {
  type: "shortcut",
  name: "Interaction Demo Trigger",
  workflow: `#/workflows/${workflow.definition.callback_id}`,
  inputs: {
    channel_id: { value: "{{data.channel_id}}" },
    user_id: { value: "{{data.user_id}}" },
  },
};
export default trigger;
manifest.ts 에 추가하고요
import { Manifest } from "deno-slack-sdk/mod.ts";
import { workflow as InteractiveBlocksDemo } from "./interactive_blocks_demo.ts";
// Add this
import { workflow as InteractiveMessageDemo } from "./interactive_message_demo.ts";
export default Manifest({
name: "stoic-wolf-344",
description: "Demo workflow",
icon: "assets/default_new_app_icon.png",
workflows: [InteractiveBlocksDemo, InteractiveMessageDemo], // Add this
outgoingDomains: [],
botScopes: ["commands", "chat:write", "chat:write.public"],
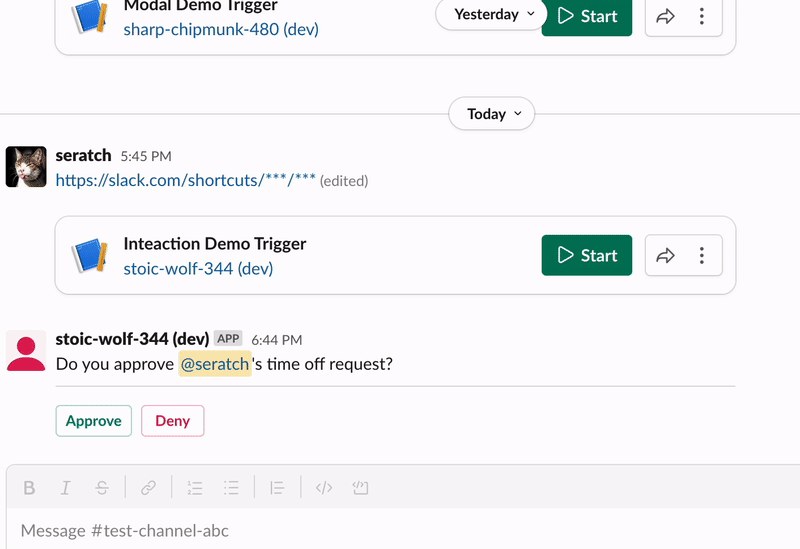
});마지막으로, 위에서 했던 것처럼 똑같은 방법으로 link 트리거를 만듭니다. 워크플로를 시작하게 되면, 버튼이 달려있는 메세지를 보실 겁니다. 그리고 버튼을 누르면, 이전의 SendMessage 의 interactive_blocks 과는 다른 점을 보실 수 있을 겁니다. (이전에는 단순히 Approve 버튼을 클릭 했다 라는 메세지가 나왔다면, 이번에는 Approve 에서 감사하다 라는 메세지가 나옵니다.)

출력되는 메세지를 변경한 코드는 다음과 같습니다.
  .addBlockActionsHandler("approve", async ({ body, client, inputs }) => {
    const text = "Thank you for approving the request!";
    await client.chat.update({
      channel: inputs.channel_id,
      ts: body.container.message_ts,
      text,
      blocks: [{ type: "section", text: { type: "mrkdwn", text } }],
    });
    return { completed: true, outputs: {} };
  })
Deny 버튼에 대해서는 첫번째 예제와 같이 똑같이 모달 화면을 띄웁니다. 그렇지만 그와 동시에 의미있는 메세지도 같이 남깁니다.
Deny 버튼을 클릭했을때의 핸들링을 위한 코드 입니다. 여기서 알고 가셔야 하는 부분은 interactivity 를 inputs 에서 받아오는게 아니라 body 데이터에서 가지고 온다는 것입니다.
  .addBlockActionsHandler("deny", async ({ body, client, inputs }) => {
    const text =
      "OK, we need more information... Could you share the reason for denial?";
    await client.chat.update({
      channel: inputs.channel_id,
      ts: body.container.message_ts,
      text,
      blocks: [{ type: "section", text: { type: "mrkdwn", text } }],
    });
    await client.views.open({
      interactivity_pointer: body.interactivity.interactivity_pointer,
      view: buildNewModalView(),
    });
    // To continue interactions, return completed: false
    return { completed: false };
  })
Block Kit 이나 모달에 익숙하지 않다면, 잘 이해가 안되는 코드가 있을 수 있습니다. 상대적으로 단순한 코드부터 시작하여 코드를 바꿔보면서 더 배워보실 수 있으실겁니다.
블록을 편집할때는, Block Kit Builder 를 사용해 보시면 좋습니다. 아직 사용해보지 않았다면, 해당 사이트를 방문하여 좌측의 사용 가능한 블록들을 눌러보세요.
Wrapping Up
이번 튜토리얼에서는 다음과 같은 내용을 배웠습니다.
- SendMessage 의 interactive_blocks 을 사용하는 방법과, 커스텀 펑션에서 해당 이벤트를 다루는 방법
- 인터렉티브한 메세지를 보내고,해당 메세지의 인터렉티브 이벤트를 다루는 커스텀 펑션을 만드는 방법
이 프로젝트는 다음 주소에서도 확인하실 수 있습니다. https://github.com/seratch/slack-next-generation-platform-tutorials/tree/main/12_Button_Interactions
이번 튜토리얼도 즐거우셨으면 좋겠네요. 마찬가지로 피드백이나 코멘트가 있으시다면 트위터 (@seratch) 로 연락주시거나, 여기 남겨주세요.
Happy hacking with Slack’s next-generation platform 🚀