This is translation of Slack Next-gen Platform – “reaction_added” Event Trigger – DEV Community 👩💻👨💻 written by Kaz (SDK Engineering & DevRel at Slack), I do not include any personal opinion here except guessing when meaning of original text is not clear for me)
이 글은 슬랙의 SDK Engineering / DevRel 인 Kaz 의 글을 번역한것입니다. 저의 개인 의견은 들어가지 않으며, 일부 원문의 의미가 애매한 경우에만 부연 설명을 달았습니다.
이번 튜토리얼에서는 채널 ID 를 필요로 하지 않는 event 트리거를 사용하는 방법에 대해서 배워볼 것입니다. event 트리거는 연결되어있는 Slack 워크스페이스에서 특정한 이벤트가 발생했을 때 트리거 될 수 있습니다. 각각의 event 트리거 타입은 입력을 위한 자체적인 데이터 스키마를 가지고 있고, 워크플로가 트리거로부터 필요한 정보들을 받아볼 수 있습니다.
그리고 2가지 타입의 event 트리거가 있습니다.
첫번째는 워크스페이스 전체의 이벤트를 캡쳐할 수 있는 트리거 입니다. 이러한 이벤트의 예로 “channel_created” 이벤트를 꼽을 수 있겠습니다. (채널이 생성되었음) 그외에는 “dnd_updated”(해당 멤버의 Do not Disturb 셋팅이 변경되었음), “emoji_changed” (커스텀 이모지가 추가되었거나 변경되었음), “user_joined_team”(새 멤버가 조인하였음) 등이 있겠죠.
다른 한가지는 특정 채널에서 발생하는 이벤트를 캡쳐할 수 있는 트리거 입니다. 이러한 이벤트의 예로는 “message_posted” (채널에 메세지가 작성되었음), “reaction_added” (멤버가 이모지 리액션을 메세지에 추가하였음), “user_joined_channel” (유저가 공개 또는 비공개 채널에 조인하였음), “user_left_channel” (유저가 공개 또는 비공개 채널에서 나갔음) 등이 있겠습니다.
이번 튜토리얼 에서는 제목에서 언급한 바와 같이 “reaction_added” 를 가지고 진행 해보겠습니다.
Prerequisites
차세대 플랫폼을 접하는 것이 처음이시라면, 이전의 튜토리얼인 “The Simplest Hello World” 부터 읽어주세요. 요약하면 유료 Slack 워크스페이스와 해당 워크스페이스에서 “beta feature” 를 사용할 수 있는 권한이 필요합니다. 가지고 계시다면 Slack CLI 와 워크스페이스를 연결하기만 하면 됩니다.
준비되었다면 앱을 한번 만들어보도록 하죠. 시작해보겠습니다.
Create a Blank Project
slack create 명령어를 사용하여, 새로운 프로젝트를 시작할 수 있습니다. 이 튜토리얼에서는 아무것도 없는 상태에서 앱을 만들어보겠습니다. “Blank Project” 를 선택하여 주십시요.
$ slack create
? Select a template to build from:

  Hello World
  A simple workflow that sends a greeting

  Scaffolded project
  A solid foundational project that uses a Slack datastore

> Blank project
  A, well.. blank project

  To see all available samples, visit github.com/slack-samples.
프로젝트가 생성되면, slack run 명령어가 정상적으로 동작하는지 확인해보세요. 이 명령어는 “dev” 버전의 앱을 워크스페이스에 설치합니다. 이 앱의 봇 유저가 생성되고, 이 봇은 API 호출을 위한 봇 토큰 값을 가지고 있습니다.
$ cd affectionate-panther-654
$ slack run
? Choose a workspace  seratch  T03E94MJU
   App is not installed to this workspace

Updating dev app install for workspace "Acme Corp"

  Outgoing domains
   No allowed outgoing domains are configured
   If your function makes network requests, you will need to allow the outgoing domains
   Learn more about upcoming changes to outgoing domains: https://api.slack.com/future/changelog
  seratch of Acme Corp
Connected, awaiting events
Connected, awaiting events 로그 메세지를 보신다면, 이 앱이 성공적으로 워크스페이스에 연결된 것입니다. “Ctrl +C” 를 눌러 로컬 앱 프로세스를 종료합니다.
Define Workflow and Trigger
간단한 데모 워크플로와 link 트리거를 정의해보겠습니다. workflow_and_trigger.ts 로 저장합니다.
// ----------------
// Workflow Definition
// ----------------
import { DefineWorkflow, Schema } from "deno-slack-sdk/mod.ts";
export const workflow = DefineWorkflow({
  callback_id: "example-workflow",
  title: "Example Workflow",
  input_parameters: {
    properties: {
      // All the possible inputs from the "reaction_added" event trigger
      channel_id: { type: Schema.slack.types.channel_id },
      user_id: { type: Schema.slack.types.user_id },
      message_ts: { type: Schema.types.string },
      reaction: { type: Schema.types.string },
    },
    required: ["channel_id", "user_id", "message_ts", "reaction"],
  },
});

// TODO: Add function steps here

// ----------------
// Trigger Definition
// ----------------
import { Trigger } from "deno-slack-api/types.ts";
const trigger: Trigger<typeof workflow.definition> = {
  type: "event", // Event Trigger
  name: "Trigger the example workflow",
  workflow: `#/workflows/${workflow.definition.callback_id}`,
  event: {
    // "reaction_added" event trigger
    event_type: "slack#/events/reaction_added",
    channel_ids: ["C04FB5UF1C2"], // TODO: Update this list
    // The condition to filter events
    filter: {
      version: 1,
      // Start the workflow only when the reaction is :eyes:
      root: { statement: "{{data.reaction}} == eyes" },
    },
  },
  inputs: {
    channel_id: { value: "{{data.channel_id}}" },
    user_id: { value: "{{data.user_id}}" },
    message_ts: { value: "{{data.message_ts}}" },
    reaction: { value: "{{data.reaction}}" },
  },
};
export default trigger;
트리거의 event.event_type 은 반드시 “slack#/events/reaction_added” 여야 합니다. 여기서 트리거로부터 5가지의 입력값을 가지고 올 수 있습니다. 이 입력값에 대해서 자세히 알아보실려면 공식 문서의 data 프로퍼티 항목에 대해서 보시면 되겠습니다.
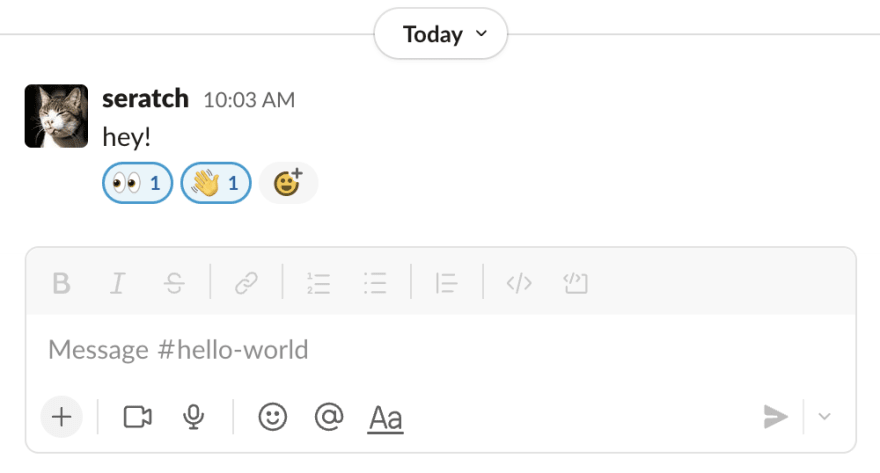
또한, channel_ids: [“C04DPBYUQUC”], // TODO: Update this list 부분도 업데이트 되어야 합니다. 일단 이 워크플로를 추가할 공개 채널을 고르세요 (현시점에서는 공개채널만 지원합니다.) 그리고 해당 채널의 ID 를 복사하여 붙어넣으시기 바랍니다. Slack UI 상에서 채널이름을 클릭하면, 팝업 모달이 열립니다. 거기서 아래쪽으로 스크롤 다운을 하면 다음과 같이 채널 ID 를 확인하실 수 있습니다.

그리고 이 워크플로를 manifest.ts 에 추가합니다.
import { Manifest } from "deno-slack-sdk/mod.ts";
import { workflow as DemoWorkflow } from "./workflow_and_trigger.ts";

export default Manifest({
  name: "distracted-bison-253",
  description: "Demo workflow",
  icon: "assets/default_new_app_icon.png",
  workflows: [DemoWorkflow],
  outgoingDomains: [],
  botScopes: [
    "commands",
    "chat:write",
    "reactions:read", // required for the "reaction_added" event trigger
    "channels:history", // will use in custom functions later
    "channels:join", // will use in custom functions later
  ],
});
여기서는 워크플로 추가뿐만 아니라 event 트리거를 위한 “reactions:read” 스코프도 botScopes 내에 추가해야 합니다. 다른 이벤트 트리거를 사용하는 경우도 있으실텐데, 필요로 하는 스코프는 다음 링크에서 확인해보시기 바랍니다.
Create an Event Trigger
다음으로 두개의 윈도우 터미널을 열어주세요. 하나는 slack run 을 실행하고, 다른 하나에서는 slack trigger create 명령어를 실행할 것입니다.
워크플로를 등록하기 위해서, 첫번째 터미널에서 slack run 명령어를 실행주시고, 그 다음 slack triggers create –trigger-def workflow_and_trigger.ts 를 다른 터미널에서 실행해주십시요. 다음과 같은 결과물을 보실 수 있습니다.
$ slack triggers create --trigger-def ./workflow_and_trigger.ts
? Choose an app  seratch (dev)  T03E*****
   distracted-bison-253 (dev) A04FNE*****

⚡ Trigger created
   Trigger ID:   Ft04EJ8*****
   Trigger Type: event
   Trigger Name: Trigger the example workflow
Add 👀 to A Message in the Channel
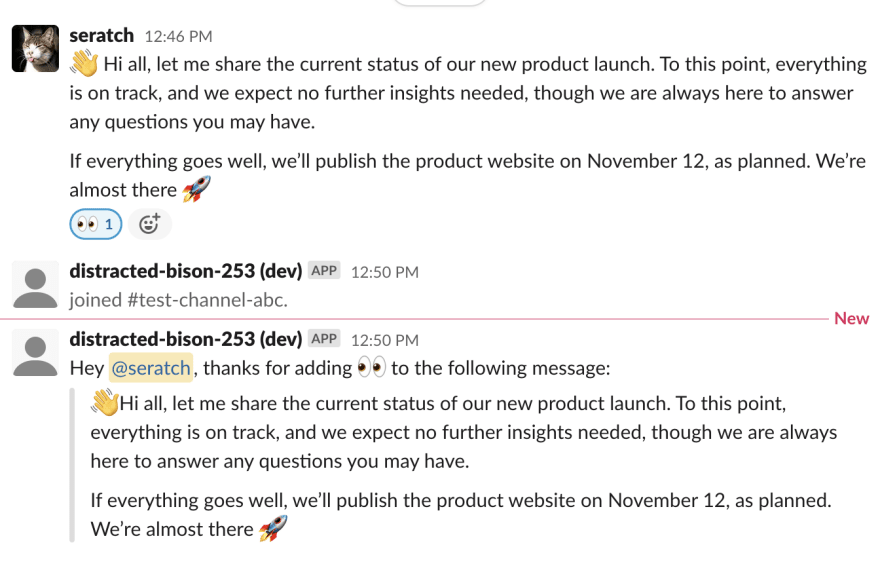
자 이제 어떻게 워크플로가 동작하는지 확인해보겠습니다. 👀 :eyes: 이모지를 리액션을 채널내의 메세지에 추가해보세요. slack run 터미널에서 다음과 같은 결과물을 보실 겁니다.
$ slack run
? Choose a workspace  seratch  T03E94MJU
   distracted-bison-253 A04FACHPQ5R

Updating dev app install for workspace "Acme Corp"

⚠️  Outgoing domains
   No allowed outgoing domains are configured
   If your function makes network requests, you will need to allow the outgoing domains
   Learn more about upcoming changes to outgoing domains: https://api.slack.com/future/changelog
✨  seratch of Acme Corp
Connected, awaiting events

2022-12-15 10:03:50 [info] [Fn04FCVD67J8] (Trace=Tr04G077TW80) Function execution started for workflow function 'Example Workflow'
2022-12-15 10:03:50 [info] [Wf04FP576X3K] (Trace=Tr04FP5F70HX) Execution started for workflow 'Example Workflow'
2022-12-15 10:03:51 [info] [Fn04FCVD67J8] (Trace=Tr04G077TW80) Function execution completed for function 'Example Workflow'
2022-12-15 10:03:51 [info] [Wf04FP576X3K] (Trace=Tr04FP5F70HX) Execution completed for workflow 'Example Workflow'
다른 이모지의 경우는 동작하지 않습니다. :wave: 이모지를 추가하더라도 아무일도 벌어지지 않습니다.
Access The Channel Content
만약 기존의 Events API 가 익숙하신 분이라면, Events API 와 차세대플랫폼의 Event 트리거의 차이점에 대해서 해깔리실 수 있습니다.
Events API 는 채널내에서 앱의 멤버쉽을 계속해서 요구합니다. 그 말은 앱이 이벤트를 수신할 때, 이 앱은 항상 채널 컨텐츠에 접근하게 됩니다. (채널의 멤버여야 한다는 이야기)
반대로, 차세대플랫폼의 Event 트리거는, 앱의 봇유저가 이벤트가 발생하는 채널에 멤버가 아니여도 트리거 될 수 있습니다.
위의 워크플로에 채널의 컨텐츠에 접근할 수 있도록 해주는 간단한 펑션을 하나 추가해보겠습니다. functions.ts 라는 이름으로 다음의 소스코드를 저장합니다.
import { DefineFunction, Schema, SlackFunction } from "deno-slack-sdk/mod.ts";

export const def = DefineFunction({
  callback_id: "reply_to_reaction",
  title: "Reply to a reaction in a channel",
  source_file: "function.ts",
  input_parameters: {
    properties: {
      channel_id: { type: Schema.slack.types.channel_id },
      user_id: { type: Schema.slack.types.user_id },
      reaction: { type: Schema.types.string },
      message_ts: { type: Schema.types.string },
    },
    required: ["channel_id", "user_id", "reaction", "message_ts"],
  },
  output_parameters: {
    properties: { ts: { type: Schema.types.string } },
    required: ["ts"],
  },
});

export default SlackFunction(def, async ({ inputs, client }) => {
  // https://api.slack.com/methods/conversations.join
  // requires "channels:join" scope in manifest.ts
  const joinResponse = await client.conversations.join({
    channel: inputs.channel_id,
  });
  if (joinResponse.error) {
    const error = `Failed to join the channel due to ${joinResponse.error}`;
    return { error };
  }
  // https://api.slack.com/methods/conversations.history
  // requires "channels:history" scope in manifest.ts
  const historyResponse = await client.conversations.history({
    channel: inputs.channel_id,
    latest: inputs.message_ts,
    inclusive: true,
    limit: 1,
  });
  if (historyResponse.error) {
    const error =
      `Failed to fetch the channel content due to ${joinResponse.error}`;
    return { error };
  }
  const messageText = (historyResponse.messages[0].text ||
    "(Failed to fetch the message text)").replaceAll("\n", "\n>");
  const replyText =
    `Hey <@${inputs.user_id}>, thanks for adding :${inputs.reaction}: to the following message:\n>${messageText}`;
  // https://api.slack.com/methods/chat.postMessage
  // requires "chat:write" scope in manifest.ts
  const replyResponse = await client.chat.postMessage({
    channel: inputs.channel_id,
    text: replyText,
  });
  if (replyResponse.error) {
    const error = `Failed to post a message due to ${replyResponse.error}`;
    return { error };
  }
  return { outputs: { ts: replyResponse.ts } };
});
공개채널에 단순히 메세지를 남기기 위해서는, chat:write_public 스코프를 가진 chat.postMessage API 외에 별도의 추가적인 API 콜을 필요로 하지 않습니다. 그러나 만약 앱이 이전에 포스팅 되었던 메세지의 내용이나 그외 다른 것들을 알아야 한다면, 이 펑션은 두개의 Slack API (conversations.join 과 conversations.history) 콜을 합니다.
그리고 나서, 다음 펑션 스텝을 workflow_and_trigger.ts 내의 워크플로에 추가합니다.
import { def as reply } from "./function.ts";
workflow.addStep(reply, {
  channel_id: workflow.inputs.channel_id,
  user_id: workflow.inputs.user_id,
  reaction: workflow.inputs.reaction,
  message_ts: workflow.inputs.message_ts,
});
다시 워크플로를 실행해보시면, 앱의 봇유저가 자동으로 채널에 조인을 하고, 포스팅 되었던 메세지를 포함한 새로운 메세지를 채널에 남기는 것을 보실 수 있습니다.
Don’t Want to Hard-code the channel_ids?
채널 ID 를 하드코딩 하기를 원하시지 않을 수도 있는데요, 물론 하드코딩이 되어있으면 트리거를 다시 활용하기도 어렵고, 관리하기도 어렵습니다. (다른 채널에서도 하기위해서는 트리거를 새로 만들어야 하고요)
그러나 안타깝게도, 소스코드 파일을 이용하여 트리거를 생성할 때는 채널ID 를 뺄수가 없습니다. 그러나 다른 방법으로 트리거 런타임을 만들 수는 있습니다. 바로 커스텀 펑션에서 트리거를 생성/수정(generation/modification) 하는 API 콜을 하는 것입니다. 공식문서를 참조하세요. 다른 튜토리얼에서도 한번 다루어 보겠습니다.
Wrapping Up
이번 튜토리얼에서는 다음과 같은 내용을 배워보았습니다.
- 채널 기반의 event 트리거를 정의하고 사용하는 방법
이 프로젝트는 다음 주소에서도 확인하실 수 있습니다. https://github.com/seratch/slack-next-generation-platform-tutorials/tree/main/08_channel_created_Event_Trigger
이번 튜토리얼도 즐거우셨으면 좋겠네요. 마찬가지로 피드백이나 코멘트가 있으시다면 트위터 (@seratch) 로 연락주시거나, 여기 남겨주세요.
Happy hacking with Slack’s next-generation platform 🚀